Showing posts with label Weekend project. Show all posts

Wednesday, 10 December 2014

How to Crochet a Bobble Hat


Now, this is no means a definitive guide, but this is simply MY way of crocheting bobble beanies for my boys. (I cannot resist alliteration, sorry about that.) Lots of people have asked me how to make hats, and last year I published this pattern for ear flap bobble hats. I found that when I returned to it again this year, my sizing was WILDLY off kilter- I mean, HOW big do I think my kids' heads are, exactly? Either that or I actually wrote the wrong stitch on that pattern. My bad, I'm sorry if your toddler hats are enormous and actually fit your granddad instead. Of course, tension, hook and yarn has something to do with it, but if you want that pattern to work I'd suggest switching to htr.

 I wanted to give you a guide to creating your own crochet beanie hat pattern, with some helpful hints and ideas from me. This is all written in UK crochet terminology, with the bobble hat pattern in DK yarn. I'm assuming some crocheting ability, but this should help boost your skills if you're a total beginner. 

AAANNNNNND bobble hat make great gifts, yes? Certainly this time of year, anyway...

Crocheting flat circles
I begin my bobble hat pattern with a flat circle. I think, for hats, it's important to keep drafts out, so to avoid a hole in the epicentre of the hat, I begin with a magic ring. Like so:


 that's blurry, sorry. 

Here's a lovely video, made by lovely person I accidentally met on a train to London one day. She just so happened to be a knitting journalist. What a job! I'm so jealous. Actually she had left and was training to be a midwife but knitting THE most beautiful shawl when we met. 

To make an even, round circle, it's essential to have the right amount of stitches. I always start with 12 in round 1. You can use double crochet (dc)/single crochet, half trebles (htr)/half doubles, or treble crochet (tr)/double crochet. You could even vary the stitch each round for an interesting effect. 

If you're not happy making a magic/adjustable circle/loop/ring, then chain 3, join with a ss and work your first 12 stitches into the ring. 
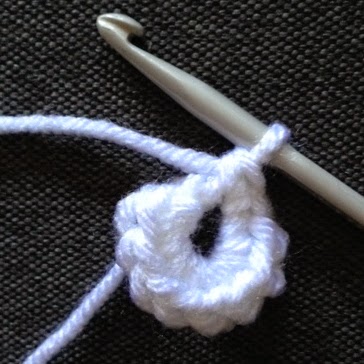

Join your first round with a slip stitch (ss) to the first stitch in the round. We'll be working in rounds, dontcha know. 

Sizing your Hat
You can be very precise, if you wish, and measure the recipient's head for the circumference of their noggin. Then you need to work out the diameter- just divide the circumference by Pi (3.14 roughly) and you get diameter TADAH! Otherwise just wing it. Phew, that's better. Yes, winging it is the crocheter's friend. 

You'll need to work a certain amount of increase rounds to get a decent enough sized disc (diameter-sized!) that will be shaped into a hat. For each round, you'll need to increase by 12 stitches to get an even, neat circle. 

So here's a quick recipe/ hat pattern:-

To begin: With yarn A 4 ch, sl st to form a ring, or make a magic circle/loop/adjustable ring

Round 1: 3 ch (counts as 1 tr), 11 tr into ring. Join with sl st to 3 ch. [12 sts]

Round 2: 2 ch (counts a 1 tr), 1tr into first st , (2 tr into next st) 12 times, join with sl st into 2 ch. [24 sts]

Round 3: 2 ch (counts as 1 tr), 1 tr into first st, (1 tr into next st, 2 tr into next) 12 times. 1 tr into last st, join with sl st into 2 ch. [36 sts]

Round 4: 2 ch (counts as 1 tr), 1 tr into first st, (1 tr into each of the next 2 sts, 2 tr into next) 12 times, 1 tr into each of the last 2 sts, join with sl st into 2 ch. [48 sts]

Round 5: 2 ch (counts as 1 tr), 1 tr into first st, (1 tr into each of the next 3 sts, 2 tr into next) 12 times. 1 tr into each of the last 3 sts, join with sl st into 2 ch. [60 sts]

Round 6: 2 ch (counts as 1 tr), 1 tr into first st, (1 tr into each of the next 4 sts, 2 tr into next) 12 times, 1 tr into each of the last 4 sts, join with sl st into 2 ch. [72 sts]

And continue like that! I would say that 5 increase rounds is plenty for a newborn baby hat, 6 for a baby, 7 for a toddler and 8 for a child of around 4-8. Of course you can keep on increasing for an adult hat! 10 increase rounds would be about the right size, so round ten would look something like this:

Round 10: 2ch (counts as 1 tr), 1 tr into first st, (1 tr into each of the next 8 sts, 2tr into next) 12 times, 1 tr into each of the last 8 sts, join with ss to ch-2. [120 sts]


Shaping your Hat:

After this, you simply work as many rounds without increasing as you wish, in order to achieve the bowl-shape for your hat. I would say 8-10 rounds like the following will give you a cosy hat:

ch2 (counts as tr), 1tr into each st around, join with ss into ch-2. 

But repeat this round until you're happy with the length. 

To change colour at the end of the row, simply work the first part of your stitch in the old colour:

Then drop the old yarn, and prepare your new yarn. Complete the stitch in your new colour. This will make sure you have a neat join with no weird colour blocks where they shouldn't be:


Finishing your Hat

Ribbed cuff: 
A cosy ribbed cuff ensures a tight fit and looks marvellous. Here's an easy (cheat's) way to achieve it in crochet. First count the stitches in your hat. Turn the hat upside down and count the 'V's; if you have counted correctly, you should have stitches= 12 x (amount of increase rounds). Yes? Make a note of this. Good. Then let's proceed. 

ch 16, Beginning in 2nd chain from your hook, dc (sc) into each ch to end, turn. 

Round 2: ch1, 1dc into back loops ONLY (blo) of each st along. Turn. 

Repeat row 2 until you have as many rows as stitches in your hat round. Hurrah! Clever, eh? Now join the cuff by placing wrong sides together and slip stitch the cuff to hat, matching each row end of the cuff with a stitch of the bottom of the hat. Sew up the little cuff seam, and turn up!

If you want to make ear flaps, check out the tutorial on my ear flap hat pattern. 

Adding a bobble (pom pom) will increase your hat pleasure considerably, as Albie demonstrates here:

And George, well he refuses to wear his hat. End of. This is best I could do. Please don't judge my parenting on his dummy, if you knew the noise that kid makes you would pacify him too. (he is teething canines and it's the only thing that makes him happy). 


I have used Stylecraft DK Special (acrylic yarn) for these hats, and used a 3.5mm hook. 

Albie's hat is in the following colours:
Walnut 
Petrol
Spice
Lime
Parchment

George's Hat is in:
Petrol
Sherbet
Walnut
Silver 

So there you have it. A simple, adaptable DK yarn crochet hat in treble crochet. 

Merry makings!
xxx


Friday, 6 December 2013

Free pattern Friday: Baby and Toddler hat

Hello! Welcome to a new 'strand' on my blog- free pattern Friday! I've been promising this free crochet baby hat pattern for a couple of weeks now, so here it is! It's a super simple, quick project, perfect for a baby stocking filler or gift for a niece or nephew, grandson, god daughter...

NOTE: I've amended the pattern to include a different hook size! My children and nephews have large heads so please be aware that these hat sizes are approximate. 
I've sized up to aged 3, though obviously every child's head is different so go for whichever size you think will be best for the poppet who will be modelling it. I've used a 3.5mm hook and double knit yarn, you shouldn't need more than a 50g ball for a baby so use something soft and washable. Debbie Bliss Baby Cashmerino is perfect. I would recommend using wool or acrylic (or a mix) for this hat; cotton just isn't stretchy enough and you want this hat to be snug with some stretch in it for warming cold little heads over the coming months. 


You will need:-
1 x 50g ball of DK-weight yarn (yarn A), such as Annell Rapido in Ochre (Ages 0-6 months, 6-12 months)
2 x 50g ball of DK-weight yarn (ages 1-2 years, 2-3 years)
a small amount of contrasting DK-weight yarn for trim and pom pom (yarn B)
3.5mm or 4mm hook
Pom pom maker or two cardboard discs
Scissors and Tapestry needle

I have used UK crochet terminology throughout.

ch= Chain
tr= Treble crochet
Sl st = Slip stitch
dc= double crochet
RS= Right side (front)
st= Stitch
tr2tog=

Baby 0-6 Months
To begin: With yarn A 4 ch, sl st to form a ring
Round 1: 3 ch (counts as 1 tr), 11 tr into ring. Join with sl st to 3 ch. (12 sts)
Round 2: 2 ch (counts a 1 tr), 1tr into first st , *2 tr into next st. Repeat from * around, join with sl st into 2 ch.  (24 sts)
Round 3: 2 ch (counts as 1 tr), 1 tr into first st, *1 tr into next st, 2 tr into next. Repeat from * around. 1 tr into last st, join with sl st into 2 ch.

Round 4: 2 ch (counts as 1 tr), 1 tr into first st, *1 tr into next 2 sts, 2 tr into next. Repeat from * around. 1 tr into last 2 sts, join with sl st into 2 ch.
Round 5: 2 ch (counts as 1 tr), 1 tr into first st, *1 tr into next 3sts, 2 tr into next. Repeat from * around. 1 tr into last 3 sts, join with sl st into 2 ch.
Round 6: 2 ch (counts as 1 tr), 1 tr into first st, *1 tr into next 4 sts, 2 tr into next. Repeat from * around. 1 tr into last 4 sts, join with sl st into 2 ch.
Round 7- 17: 2 ch (counts as 1 tr), 1 tr into each st around. Join with ss to 2 ch. Fasten off yarn on final round.

For earflaps: With RS facing, locate the centre 13 stitches of the side of the hat (where the ears usually are on the head!).
Join in yarn A. 2 ch, 1 tr into each of the next 12 sts. Turn
2 ch, miss 1, 1 tr into next 9 sts. tr2tog into last 2 sts. Turn.
2ch, miss 1, 1 tr into next 7 sts, tr2tog into last 2 sts. Turn.
2 ch, miss 1, 1 tr into next 5 sts, tr2tog into last 2 sts. Turn.
2 ch, miss 1, 1 tr into next 3 sts, tr2tog into last 2 sts. Fasten off yarn A.

For trim: Join yarn B at back of hat, ch 1, 1 dc into each st around. Make pom pom in yarn B and stitch securely to top of hat.

Baby 6-12 months
Rounds 1-6: as 0-6 months 
Round 7: 2 ch (counts as 1 tr), 1 tr into first st, *1 tr into next 5 sts, 2 tr into next. Repeat from * around. 1 tr into last 5 sts, join with sl st into 2 ch.

Rounds 8-19: 2 ch (counts as 1 tr), 1 tr into each st around. Join with ss to 2 ch. Fasten off yarn on final round.

Work earflaps as before, working with 15 stitches to begin, and decreasing at the start and end of each row. Work trim as before

Toddler 1-2 years
Rounds 1-7: As 6-12 months
Round 8: 2 ch (counts as 1 tr), 1 tr into first st, *1 tr into next 6 sts, 2 tr into next. Repeat from * around. 1 tr into last 6 sts, join with sl st into 2 ch.
Rounds 9-21: 2 ch (counts as 1 tr), 1 tr into each st around. Join with ss to 2 ch. Fasten off yarn on final round.
Work earflaps as 6-12 months.

Toddler 2-3 years
Rounds 1-8: As 1-2 years
Round 9: 2 ch (counts as 1 tr), 1 tr into first st, *1 tr into next 7 sts, 2 tr into next. Repeat from * around. 1 tr into last 7 sts, join with sl st into 2 ch.
Rounds 10-22: 2 ch (counts as 1 tr), 1 tr into each st around. Join with ss to 2 ch. Fasten off yarn on final round.
Work earflaps as before, beginning with 17 sts.

Here's George modelling his very own bobble hat! He is small, so he is wearing the 0-6 month size. You could add some little felt ears, instead of a pom pom if you like...or perhaps add a braid to the ear flaps for a little trapper hat vibe (I didn't add braids to George's as it could potentially be a safety issue for small babies). 

Happy hooking y'all! 
xxx

Monday, 2 December 2013

A Very Crochet Christmas...

Every year, around December 1st, I panic. I haven't bought any gifts, I am totally skint and I am forever struggling to think of original, thoughtful gifts. Increasingly, over the past three or four years, I've taken to making presents. And this year is no exception. I have a stash and I'm not afraid to use it. So I thought I'd round up some favourite ideas and patterns from my personal archive and around the web to get the old creative juices flowing. Click on the links to take you to the pattern. Disclaimer: All of my patterns here are freeeeeeeeeeeeeee! Though I'd prefer it if you didn't make these to sell, do of course make lots of these to give to friends and family.

For the laydeeeeeez:-

...or even my Cath Kidston cowl...

For the gents:-
My brother has requested another iPhone sleeve, the cheek of it! He has also requested a Sarah cowl in 'man colours'. 
This hat from Learn to Knit, Love to Knit by Anna Wilkinson was a hit when I made it for my hubby for his birthday, so I'm making a grey and cream one for my brother in law this year.

For the babes:-
This bedroom mobile is perfect for babies and is jolly good fun to make. Pattern from the Coats craft website here.

I loved making this little Giraffe for baby Ted, pattern can be found here.

Baby's ear flap hat- FREE PATTERN coming this week!

And for the homebodies:-

I made my mother-in-law some lovely potholders! These two are free patterns found via Pinterest...
 Star pattern here
Square pot holder pattern here

And that's it for now! There are of course thousands of free crafty patterns and tutorials online, I find pinterest a never-ending source of inspiration. Check out Tanya's blog for more crochet gift ideas and beautiful crochet treats!

happy holiday hooking!

Friday, 29 November 2013

EASY PEASY chunky snood tutorial

Hello! Welcome to my new followers! I've gained many new faces here and over on Facebook and Instagram- thank you everyone for stopping by to take a peek into my little hooky world. Once again I find myself apologising for the lengthy gap between blogposts, but you guys don't mind, right? After all, it's quality you're after, not quantity. And today I have a little quality post for you all. Another FREE crochet snood pattern! This one is crafted in chunky yarn, with a nice bright border. And guess what? it takes hardly any time at all! If you liked the Wool and the Gang bright knitted cowl in Mollie Makes, you will LOVE this.

So here she is! 


Crocheted in lattice stitch with an extra chunky edge, this is quick, simple and so so pretty! Her name is Sarah, after the person who now has this lovely gift. 

FREE chunky crochet snood pattern:- 

I have used UK crochet terminology throughout.
Ch= Chain
Sl St= Slip stitch
htr= Half treble crochet
dc= double crochet
ch sp= Chain Space

2 x 50g balls of Chunky yarn (I have used Sirdar Click Chunky)
6mm Hook

Small amount of super chunky yarn in contrasting colours (I used Rowan Big Wool in grey and Patons Big Fab in neon pink)
8mm hook

To begin make 100ch, join with a sl st to form a large ring. 

Round 1: Working in rounds, 3 ch, miss 1 ch, *1 htr into next st, 1 ch, miss 1 ch. Repeat from * to end, miss last ch, sl st to second of 3 ch to join. 

Round 2 onwards: Sl st into first ch sp. 3 ch, 1 htr into next ch sp. *1 ch, 1 htr into next ch sp. Repeat from * to end. 

Repeat row 2 for pattern! I worked around 25 rounds of the pattern for a lovely thick band, that sits snugly around your neck, and can be pulled up over your ears to rest atop your hair. Fasten off and carefully weave in any ends.

To finish: Using 8mm hook and super chunky yarn, join in the yarn in any ch sp. 1 ch, dc into each ch sp around. Repeat using second contrasting colour. fasten off and weave in any ends. 

You should have something like this:
(OMG, it's so hard to photograph neon! Especially when I am using an iPhone on a dull grey day)

I hope you like it! It makes an ideal gift for Christmas, but there will be more about perfect homemade pressies next week right here. Enjoy your weekend crafting all. 

xxx

Monday, 3 June 2013

Crochet iPhone cover

Last week my little brother turned 24, and rather than hinting heavily for a certain present, he asked outright if I could crochet him a cover for his iPhone 4S. So what could I do but oblige?

Here is the Finished Object...
The project was so quick and easy, and the effect rather impressed dear old Sam. So I thought I'd share my pattern with you- it makes an ideal last-minute gift, or quick make for craft fairs and whatnot. Here it is...

Crochet iPhone Cover pattern

You will need DK yarn, 4mm and 3.5mm hooks, large needle and scissors. All crochet terms are UK. 

MAKE TWO-
1. Using 4mm hook, Ch 13 to begin.
2. 1dc in second ch from hook, 1 dc in each ch to end (12 sts). Turn.
3. Ch 1, miss 1, 1dc into each st to end. Turn. 
4. Repeat row 3 17 times more. Fasten off yarn. Sew in any ends if you've changed colour. 

To make the strap- 
1. Using 4mm hook, ch 13. Turn. 
2. 1dc in second ch from hook, 1 dc in each ch to end (12 sts).Turn.
3. Ch 1, miss 1, 1 dc into next 7sts. Ch3, miss 3, 1dc in last st. Turn. 
4. Ch 1, 3dc into 3ch, 1 dc into each st to end. Turn. 
5. Ch 1, miss 1, 1dc into each st to end. fasten off, leaving longish tail.

To make up-
Place pieces wrong sides facing. Using 3.5mm hook and contrasting yarn, dc the two pieces together around three sides.  Using the tail end of the strap, sew to outside of back piece, between rows 3 and 4. Sew button onto front. 

Ta-Dah! All done. Lovely stuff.
 
xxx
 

Friday, 14 December 2012

Chunky Rib Cowl tutorial

Brrrrrrrrr it sure is cold outside! But it's warm inside. And that's because I've been making lots of these fantastic cowls! This pattern is super simple, even a beginner could do it. It's also perfect for making last-minute gifts as it only takes a couple of hours to whip one up! Wanna see what I'm talking about? Ok then...

Isn't it luuuurrrverly? So toasty and soft too. So here's how you make one. 

You will need:-
8mm Hook
Around 150g Super Chunky yarn, such as Rowan Big Wool (shown above in Burnt Orange) or Stylecraft Life Super Chunky (shown below in Sage)
Scissors and Darning needle

Crochet is in UK terminology. You'll need to know how to chain (Ch), slip stitch (ss) and treble crochet (tr).

Foundation: Make a slip knot on your chunky hook, and chain 24 to begin

Row 1: work 1tr in to the fourth ch from your hook, as shown:
Work 1 tr into each ch to the end. You should have 22 stitches, as the ch 3 at the beginning counts as your first treble crochet. Turn your work so that you're working from right to left.

Row 2: Chain 3 (counts as 1tr). Skip the very first st of the row. Work 1tr into the BACK LOOP of the next stitch below. If you look at the work from above, you'll see a series of 'V's. Just insert the hook into back loop, rather than both at once. See below, where my finger is pointing is the correct place to insert the hook, and you can see that I've begun working my treble into the back loop:


work 1tr into each stitch (back loops only) all the way across.

Once you get to the end, work the last stitch into the top of the ch3 of the row below. This is your turning chain. Again, work the stitch into the back loop as below:

 Turn your work.

Row 3- 36: Work as row 2! Skipping the first stitch and working the last tr into the turning chain will ensure you have very straight, neat edge. Work the pattern for 36 rows.

Row 37: To join the two short ends together seamlessly, you'll work your final row slightly differently. Line up the two short ends so the stitches match. There should be 22 stitches at the beginning, and 22 stitches in the 36th row. Ch 3, then insert the hook into the bottom of the first stitch of the first row you made. Remember you'll have started with a chain, so you'll be working the stitches into the ch sts. Pull a loop through- slip stitch made! Work 1tr into next st. Insert hook into next stitch of first row- as below:
Continue along to the end. You should have a ridged join that vaguely resembles a pretty plait, which doesn't look too different to the other ribs! Et voila...

Take your darning needle and weave in the ends on the reverse, pulling the ends in tightly to neaten the edges and make sure they don't work loose.

Now slip on over your head and feel the cosiness! Or, wrap it up and give it a present, up to you. I have made three for presents and can't help wearing them...

Happy hooking!


Friday, 16 November 2012

Cath Kidston Crochet Cowl tutorial

Here is a little something I hooked up on Wednesday; it's an ideal Christmas gift or little something for yourself! Mine is for myself, but there is plenty of yarn left to make another...
It's a cowl inspired by the Cath Kidston colours, crocheted up in just a few hours, making it the perfect weekend project!
 The yarn used in this project is Annell Malmedy- 100% wool from the Yvestown Shop. It's bargainous and is soft and delicious to work with. It even smells nice! Weird, right?
 I chose the following colours:-
2512 red (A)
2514 yellow (B)
2522 blue (C)
2543 off white (D)
2518 green (E)
2532 pink (F)

The pattern is written in UK crochet terminology:
Ch= chain
tr= treble (dc or double for US folk)
sk= skip
tch= turning chain

Pattern:
For the foundation chain: Using yarn A, ch 240 + 3 as a turning chain
Row 1: 1 tr into 4th ch from hook. *sk 2 ch, 3tr into next. repeat from * to end. Work 2 tr into the last ch of the row. Fasten off yarn A. Turn the work so you're now working from right to left again.
Row 2: Join in yarn B. Ch 3 (counts as first tr of row). 3tr into space between 2tr and 3tr of previous row. **3tr into next space along. Repeat from ** to end space. Work 1tr into the top of the tch of previous row. Fasten off yarn B. Turn.
Row 3: Join in Yarn C into the space between the 1tr and the 3tr of previous row. Work 1tr into same space. Repeat from ** to end of row, working 2tr into final space. Fasten off yarn C.
Rows 4-13: Repeat rows 2-3, changing colour at the end of each row. Work 13 rows in total, or more if you'd like a chunkier cowl. 
You should end up with a long strip of granny stripe with very straight edges! Take the off-white yarn and sew up the short ends to make your cowl or infinity scarf.

Slip over your head and wrap around to your heart's content. Go forth and be cosy.
Happy hooking!
xxx

Monday, 3 September 2012

A Crafty Recipe

Hello! I'm back with a little crafty recipe, something that is beautiful AND useful. I envisaged a new life for an old stool, and in my mind we will use it all around the house- reaching the spice jars in the top of the kitchen cupboards, assisting the toddler to brush his teeth at the bathroom wash basin, making an extra seat in the living room for guests, and even using it as a bedside table.
 
You will need:
1 IKEA Bekvam Stool
1 small tin of paint of your choice  ( I have used Dulux colour mix BLUE DIAMOND 6)
Scraps of vintage wallpaper
1 paintbrush
PVA glue/ Mod Podge
Clear varnish
 
Step one:
 
Don your favourite crafting dress, clogs and vintage pinny. One must prepare for a crafty day.
 
Step two:
 
Lightly sand the stool to make sure the surface is clean and ready to paint. Wipe with a damp cloth to remove any dust. My stool was a filthy old thing previously in my mother's shed, so it was FREE! However, they're only £11 new. And they're untreated solid beech so won't need any prep really.
 
Step three:
Take your stool outside. You can prime your stool if you like, however this paint didn't need an undercoat. Give your stool a coat of paint. I have used a (large) tester pot from the bargain bin in Homebase. It cost £1! This is a very thrifty stool so far...
 
Step four:
Make yourself a cuppa and wait for the paint to dry. On a warm day it won't take long. Give the stool a second coat if needed, or touch up any streaky bits. You want a nice, matt finish. Wash out your paintbrush and leave it to dry, you'll need it again later. Make another brew.
 
Step five:
 
Cut pieces of old wallpaper up into small patchwork pieces. I used the lid of a tea caddy to make sure I had some even-sized patchy squares, as well as offcuts and straight edges. I ordered a pack of vintage wallpaper scraps from the ever-so-lovely Jane over at the Little Teawagon... so for a bargain price of about £3.50 I am ready to decorate the stool's top!
 
Step six:
 
 
Using your clean paintbrush, paint PVA or mod podge onto your dry, painted surface. Carefully position your patchwork paper pieces in a pleasing-to-the-eye arrangement of sweet granny goodness. Make sure you use a decent amount of adhesive, your don't want the edges of the paper curling up. PVA dries clear so you can go mad, though wipe any splodgy bits away with a damp cloth.
 
Step seven:
 
Leave the glue to dry overnight, then seal with a layer of clear, matt varnish. Once again, leave to dry before using. Then you should have a lovely, solid stool that won't peel or chip.
 
Step eight:
 
Make more tea and stand and admire your handiwork. You just made a thrifty and frankly PEACHY stool!


happy painting, patching and piecing!
 
xxx


Tuesday, 12 June 2012

Mollie Makes- Guest blogger

Hello! Well it's another rainy day here, in mid-summer. How droll.

Welcome to all my new visitors! Thanks for stopping by and for saying hello and reading my little crochet ramblings. And also 'sorry' to my regular readers who haven't heard a peep from me in a while. On Saturday I got married. It was completely perfect, and I am so very very happy with married life so far. I will share some snapshots from the big day upon my return from honeymoon.
However, despite the fact I've been away, I haven't stopped blogging altogether. Oh no, for today I am the guest blogger over at Mollie Makes! Today's Tutorial Tuesday is bought to you by little ol' me...with some exclusive new pictures and ideas for my crochet hanger pattern.

And here are some of the pics that didn't make it into the final cut...


Now! Be off with you...straight over to Mollie Makes, where you can find my tutorial tuesday here

Cheerio!

xxx