Showing posts with label Free pattern friday. Show all posts

Wednesday, 10 December 2014

How to Crochet a Bobble Hat


Now, this is no means a definitive guide, but this is simply MY way of crocheting bobble beanies for my boys. (I cannot resist alliteration, sorry about that.) Lots of people have asked me how to make hats, and last year I published this pattern for ear flap bobble hats. I found that when I returned to it again this year, my sizing was WILDLY off kilter- I mean, HOW big do I think my kids' heads are, exactly? Either that or I actually wrote the wrong stitch on that pattern. My bad, I'm sorry if your toddler hats are enormous and actually fit your granddad instead. Of course, tension, hook and yarn has something to do with it, but if you want that pattern to work I'd suggest switching to htr.

 I wanted to give you a guide to creating your own crochet beanie hat pattern, with some helpful hints and ideas from me. This is all written in UK crochet terminology, with the bobble hat pattern in DK yarn. I'm assuming some crocheting ability, but this should help boost your skills if you're a total beginner. 

AAANNNNNND bobble hat make great gifts, yes? Certainly this time of year, anyway...

Crocheting flat circles
I begin my bobble hat pattern with a flat circle. I think, for hats, it's important to keep drafts out, so to avoid a hole in the epicentre of the hat, I begin with a magic ring. Like so:


 that's blurry, sorry. 

Here's a lovely video, made by lovely person I accidentally met on a train to London one day. She just so happened to be a knitting journalist. What a job! I'm so jealous. Actually she had left and was training to be a midwife but knitting THE most beautiful shawl when we met. 

To make an even, round circle, it's essential to have the right amount of stitches. I always start with 12 in round 1. You can use double crochet (dc)/single crochet, half trebles (htr)/half doubles, or treble crochet (tr)/double crochet. You could even vary the stitch each round for an interesting effect. 

If you're not happy making a magic/adjustable circle/loop/ring, then chain 3, join with a ss and work your first 12 stitches into the ring. 
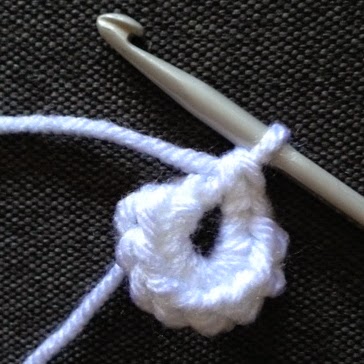

Join your first round with a slip stitch (ss) to the first stitch in the round. We'll be working in rounds, dontcha know. 

Sizing your Hat
You can be very precise, if you wish, and measure the recipient's head for the circumference of their noggin. Then you need to work out the diameter- just divide the circumference by Pi (3.14 roughly) and you get diameter TADAH! Otherwise just wing it. Phew, that's better. Yes, winging it is the crocheter's friend. 

You'll need to work a certain amount of increase rounds to get a decent enough sized disc (diameter-sized!) that will be shaped into a hat. For each round, you'll need to increase by 12 stitches to get an even, neat circle. 

So here's a quick recipe/ hat pattern:-

To begin: With yarn A 4 ch, sl st to form a ring, or make a magic circle/loop/adjustable ring

Round 1: 3 ch (counts as 1 tr), 11 tr into ring. Join with sl st to 3 ch. [12 sts]

Round 2: 2 ch (counts a 1 tr), 1tr into first st , (2 tr into next st) 12 times, join with sl st into 2 ch. [24 sts]

Round 3: 2 ch (counts as 1 tr), 1 tr into first st, (1 tr into next st, 2 tr into next) 12 times. 1 tr into last st, join with sl st into 2 ch. [36 sts]

Round 4: 2 ch (counts as 1 tr), 1 tr into first st, (1 tr into each of the next 2 sts, 2 tr into next) 12 times, 1 tr into each of the last 2 sts, join with sl st into 2 ch. [48 sts]

Round 5: 2 ch (counts as 1 tr), 1 tr into first st, (1 tr into each of the next 3 sts, 2 tr into next) 12 times. 1 tr into each of the last 3 sts, join with sl st into 2 ch. [60 sts]

Round 6: 2 ch (counts as 1 tr), 1 tr into first st, (1 tr into each of the next 4 sts, 2 tr into next) 12 times, 1 tr into each of the last 4 sts, join with sl st into 2 ch. [72 sts]

And continue like that! I would say that 5 increase rounds is plenty for a newborn baby hat, 6 for a baby, 7 for a toddler and 8 for a child of around 4-8. Of course you can keep on increasing for an adult hat! 10 increase rounds would be about the right size, so round ten would look something like this:

Round 10: 2ch (counts as 1 tr), 1 tr into first st, (1 tr into each of the next 8 sts, 2tr into next) 12 times, 1 tr into each of the last 8 sts, join with ss to ch-2. [120 sts]


Shaping your Hat:

After this, you simply work as many rounds without increasing as you wish, in order to achieve the bowl-shape for your hat. I would say 8-10 rounds like the following will give you a cosy hat:

ch2 (counts as tr), 1tr into each st around, join with ss into ch-2. 

But repeat this round until you're happy with the length. 

To change colour at the end of the row, simply work the first part of your stitch in the old colour:

Then drop the old yarn, and prepare your new yarn. Complete the stitch in your new colour. This will make sure you have a neat join with no weird colour blocks where they shouldn't be:


Finishing your Hat

Ribbed cuff: 
A cosy ribbed cuff ensures a tight fit and looks marvellous. Here's an easy (cheat's) way to achieve it in crochet. First count the stitches in your hat. Turn the hat upside down and count the 'V's; if you have counted correctly, you should have stitches= 12 x (amount of increase rounds). Yes? Make a note of this. Good. Then let's proceed. 

ch 16, Beginning in 2nd chain from your hook, dc (sc) into each ch to end, turn. 

Round 2: ch1, 1dc into back loops ONLY (blo) of each st along. Turn. 

Repeat row 2 until you have as many rows as stitches in your hat round. Hurrah! Clever, eh? Now join the cuff by placing wrong sides together and slip stitch the cuff to hat, matching each row end of the cuff with a stitch of the bottom of the hat. Sew up the little cuff seam, and turn up!

If you want to make ear flaps, check out the tutorial on my ear flap hat pattern. 

Adding a bobble (pom pom) will increase your hat pleasure considerably, as Albie demonstrates here:

And George, well he refuses to wear his hat. End of. This is best I could do. Please don't judge my parenting on his dummy, if you knew the noise that kid makes you would pacify him too. (he is teething canines and it's the only thing that makes him happy). 


I have used Stylecraft DK Special (acrylic yarn) for these hats, and used a 3.5mm hook. 

Albie's hat is in the following colours:
Walnut 
Petrol
Spice
Lime
Parchment

George's Hat is in:
Petrol
Sherbet
Walnut
Silver 

So there you have it. A simple, adaptable DK yarn crochet hat in treble crochet. 

Merry makings!
xxx


Tuesday, 21 October 2014

Cosy crochet slipper tutorial

I've been wanting to crochet a pair of slippers for absolutely YONKS. I tried and failed at making the beautiful slippers in my Japanese crochet book, and didn't fancy making thick, chunky boots. Just something simple to slip over bare feet or tights, in economical DK yarn. 

I spotted the ever-so-lovely Paula (@polly_pet) on Instagram had made her own pair inspired by some she had seen on Pinterest, and she kindly advised me on how she made hers. I just couldn't get them to work like that, either. Either too long, or too tight, or too wide. My feet are quite wide, you see. So after an evening or two of trial and error I finally came up with a workable design, and here it is. Hook them up to your heart's content! They'll make lovely (sorry) Christmas presents! 


They're ladies sizes, and crocheted in DK yarn so ideal if you have stash that needs using up. 

The pattern is worked in rounds until the piece measures the ideal length until you hit your ankle. I've written the pattern in three sizes- SMALL (size 36/37), MEDIUM (size 38/39) and LARGE (size 40/41). Size medium and large are in the brackets. If you need to adjust the length, just add extra rows or stop as you get to your ankle, basically. The the remaining piece is worked back and forth.

All terms are UK, if you're in the US please note this is all worked in hdc and sc :) 

You will need:


  • 100g DK Yarn (I used 2 x 50g balls of Drops Karisma bought at a bargain price from the shop where I teach), plus extra contrasting yarn for pom poms
  • 4mm hook
  • 2 stitch markers (free gift with issue 24 of Simply Crochet! more on that later...)
  • Some spare time (lucky you!)
  • A good film (I recommend I Capture the Castle, which is what I watched while I hooked these up)

To begin, Ch4, join with ss into ring.
  1. Ch2 (counts as htr), 11htr into ring, join with as into ch-2. [12 sts]
  2. Ch2 (counts as htr), 2htr into each st around, 1htr into last st. Join with ss into ch-2. [24 sts]
  3. Ch2 (counts as htr), *2htr into next st, 1htr into next, repeat from * to last st, 2htr into last st, join with ss into ch-2. [36 sts]
  4. Ch2 (counts as htr), 1htr into each st around, join with ss to ch-2. [36 sts]
  5. Repeat round 4 17 (19, 21 times more). Fasten off.                                                


Positioning the joining seam so that it sits at the sole of the slipper, place two stitch markers 7 sts apart at the top of the work, to indicate the 9 st space for the foot opening. Rejoin the yarn in the st next to the marker,


Heel: 
  1. Ch 2 (does not count as htr), 1htr into  same st as ch-2, work 1htr into each of the next 26 sts. Turn.
  2. Repeat as above 9 times. 
Assembly: With right sides facing place ends of slipper together and slip stitch to join together. Fasten off.

To finish: 
Rejoin yarn at seam and dc around edge, working 1dc into each row end and 1dc into each front st. Fasten off.


Make up 2 x 30mm Pom Poms in whichever manner your prefer (I use the clever Clover Pom Pom makers- so quick!) and attach. Weave in any remaining ends. Pop on feet and enjoy. 
        
Apologies for the rubbish pictures, I thought I ought to quickly snap what I was doing but the light was poor and my lens is still scratched. 

But I sure do love these slippers! And so will you. Happy feet all around. 

TTFN 
xxx

Monday, 4 August 2014

Blog hopping...

A lighter post today. It felt good to talk about something that's important to me- charity and empathy, and even just selflessness. I live in a modern Britain that seems to be all about image, the 'cult of self'... and not about helping others, educating our children in basic things like being polite and helpful and being happy. I am a happy person. And very happy to invited to join in with the current blog hop! The very lovely Kim from the colourful What Peggy Said blog invited me to join weeks ago (sorry, Kim) and last week Georgina who writes Crafting not Cleaning also nominated me. So how could I say 'no'? Kim's blog is bursting with colour, and I adore her beautiful illustrations. Like me she is a retro and vintage lover, and her instagram feed is full of inspiration, as are her photographs on What Peggy Said. I first met Georgina at A Crafty Day two years ago, and she writes TWO blogs in between her time teaching and crocheting, sewing and looking after her two daughters. Two very different blogs, but linked by a love of craft and learning. 

Like me! So, here's a small peek into my crafty mind...

1. What am I working on? 

I am coming to the end of a project I started randomly a couple of months ago. Those of you that follow me on Instagram will remember that I picked up some random odds and ends of Drops Paris Cotton and started hooking up this beauty...


Since then I've seen countless V-stitch blankets pop up, including a beautiful bright one that Kim has made for her Basset Hound, Peggy. I've been dragging this out, squeezing it in around commissions from Simply Crochet magazine, and making a lovely Mina dress for a IG friend's little girl. (I'll tell you more about that later this week). I found some abandoned projects in my ottoman the other day, so stuffed and stitched up some cloud cushions, and dug out some yarn for I-don't-know-what-yet. But I see many more V-stitch blankets on the horizon!

2. How does my work differ from others of its genre? 

I don't know that it does, really. There is a limited number of crochet stitches, and there are certainly trends that I've seen come and go on Instagram. However, I think that any project is personal as it's handmade and chosen in very personal colour palettes. 
  I've enjoyed working with these brightly-coloured acrylic yarns for my crochet lately, but my best-loved projects are the ones that have cream as a dominant colour. I prefer using cotton yarns, and love vintage colours. In fact the V-stitch blanket is my favourite colour palette yet- the right mix of cream, scandi blues and greys, with vintage mustard, pale pink and brown. YUM. I am pretty sure that I'm the only crocheter that insists on using MUSTARD in EVERY project, ha ha!


In both my knitting and crochet I have definite ideas of what designer's patterns I like, and what my favourite yarns are. I guess these things make my work mine. But really, my original patterns both here and published in magazines and my book are what make my work differ. 

3. Why do I create what I do? 
I love to find a way of making something I'm inspired by, and love sharing my discoveries in this blog. I am so inspired and encouraged by blogs, and that's ultimately what my crafting is all about- encouraging, inspiring and sharing so that readers can go and adapt and create things for themselves. I've recently become obsessed with sewing- the idea of making something made-to-measure, in my style and in fabric I've chosen is really enticing. 


I also love having something to do with my hands. The bonus is that I have something unique and handmade- and you can't put a price on that. Well, you can, but I can't be bothered! 

4. How does your creating process work?
It starts with a seed. Usually a colour will sing to me, and tell me what it needs to be. I love Pinterest and magazines, so when I see something that inspires me I begin to think about what materials I'll need and start researching the perfect yarn or fabric. Then I wait, and think for a week or two- sometimes longer if it's an original idea for a pattern, for example. Then I'll collect and gather my materials, and refer back to the pin or magazine, and try to forget about it so I'm not too influenced- I don't want to just copy someone else. 
An original pattern idea is trial and error- sometimes it works out beautifully first time. But that's very rare. I'll start making a dummy version, before checking the pattern by re-making it in the final materials. Lots of frogging, cursing and frantic scribbling occurs. However, if I'm following a pattern or working on a longer-term project like a blanket, then I get stuck straight in and never look back! I rarely make the same pattern twice, unless I really love it. Then, finally, I share it on here! my little diary, so I don't forget what I made. ro how my house looks- it's in a constant state of flux!

Now, the idea next is for me to invite three other bloggers to join in the blog hop...so you can visit them and perhaps find new blogs and inspiration. However, I think all the people I would have invited have already taken part! So why don't you go visit them anyways? They are Lazy Daisy Jones, Bobo Bun, and Vintage Sheet Addict. Three inspirational women, all of whom are multi-crafters, and all of whom are totally different and unique.  And of course all the blogs right there in my sidebar still continue to inspire me each day. 

I hope you enjoyed that rather self-indulgent post! It was nice to sit and think about my creative process, it's inspiring in itself. So go ahead, I now invite YOU to join in the creative blog hop!

xxx

Friday, 9 May 2014

Horizontal Box Stitch- a tutorial post

I've been wanting to make a new blanket for George for rather a while now. He's much too big for the little pram blankets I made over a year ago, and he needs something that will keep him cosy in his cot bed. As with the large blanket I made for Albie, it would need to be made of acrylic yarn to keep costs down and to be fully machine washable. I toyed with the idea of using Drops Paris cotton aran, but I'd need a fair amount of that particular yarn, so I opted for my favourite acrylic- Stylecraft Special DK. I bought a beautiful selection of boy colours from Deramores (where else?), and the whole lot came in around a tenner. BARGAIN. You can see the yarn in its unsullied state in this post. I loves it. I have used three new colours of this yarn: petrol blue, old gold and spice (orange). And added my favourite Sherbert (pale turquoise) and silver (pale grey). Here's how the colour sequence works in my swatch...


Anyway, I decided to make the blanket in a vintage-style stitch. So here it is: a recipe for horizontal box stitch. I love its texture and how very very simple it is. And so I desperately wanted to share this FREE pattern with you; it's taken from one of my patterns in 500 Crochet Blocks, and I've added details on how to make it blanket sized at the end...

You will need:
DK-weight yarn
4mm hook/US size G

Abbreviations (UK crochet terminology):
ch= Chain
tr= Treble crochet
dc= double crochet
tch= turning chain
st= stitch
sk= skip

Horizontal Box Stitch Pattern:

To begin, ch multiples of 20 +3 tch. 

Row 1:
3tr into fourth ch from hook


sk3, 1dc into next

3ch

3tr into next st

then continue in pattern: (sk3, 1dc into next, 3ch, 3tr into next st across), 1dc into last ch. Turn. 


Row 2:

Ch3, 3tr into first dc

1dc into 3rd ch of 3-ch

3ch, 

3tr into side post of 3-ch


Continue pattern thusly: (1dc into third of 3-ch, 3ch, 3tr into 3-ch) across, 1dc into last st. Turn. 
Row 2 sets the pattern, so just keep on repeating that until the blanket has grown to the length you'd like. 

To straighten off the top edge, work your final row as follows:
3ch, 3tr into dc, (1dc into top of 3-ch, 4tr into next dc) across, 1dc into top of final 3-ch. 


Then you can think long and hard about your edging! Personally, mine will be left without an edging, as is my wont lately. 

So here's how to size up your swatch to make it blanket-sized. My swatch is worked with a 20+3 foundation chain and I worked 10 rows. It worked out at about 10cm x12cm, so you'd roughly need to work 9 rows for a 10cm x 10cm tension square.  Are you still with me? I figure a cot-size or lap blanket on being 90cm x 120cm, which would work out with a foundation chain of 180 (+3 for your turning chain). Hang in there, you can do it. I want huge blocks of colour (less ends to sew in, ha ha!). I have five colours, so I need 24cm of each colour to make it 120cm long.  That means 20 rows of each colour. TA-DAH! 
I haven't actually crocheted the blanket yet. But I wanted to share my design process with you all and how I go about planning my blankets and large projects. I absolutely LOVE planning projects! selecting yarn, hooking up swatches, writing patterns. It's just my bag, baby. 

Thanks for sticking with me all the way through! Please feel free to pin and share, and for my box stitch patterns and ideas, click on the link to buy 500 Crochet Blocks. 

Happy hooking!
xxx

 This blog entry is my submission to the Deramores Blog Awards 2014. Deramores is the UK’s number one online retailer of knitting and crochet supplies. 


Friday, 6 December 2013

Free pattern Friday: Baby and Toddler hat

Hello! Welcome to a new 'strand' on my blog- free pattern Friday! I've been promising this free crochet baby hat pattern for a couple of weeks now, so here it is! It's a super simple, quick project, perfect for a baby stocking filler or gift for a niece or nephew, grandson, god daughter...

NOTE: I've amended the pattern to include a different hook size! My children and nephews have large heads so please be aware that these hat sizes are approximate. 
I've sized up to aged 3, though obviously every child's head is different so go for whichever size you think will be best for the poppet who will be modelling it. I've used a 3.5mm hook and double knit yarn, you shouldn't need more than a 50g ball for a baby so use something soft and washable. Debbie Bliss Baby Cashmerino is perfect. I would recommend using wool or acrylic (or a mix) for this hat; cotton just isn't stretchy enough and you want this hat to be snug with some stretch in it for warming cold little heads over the coming months. 


You will need:-
1 x 50g ball of DK-weight yarn (yarn A), such as Annell Rapido in Ochre (Ages 0-6 months, 6-12 months)
2 x 50g ball of DK-weight yarn (ages 1-2 years, 2-3 years)
a small amount of contrasting DK-weight yarn for trim and pom pom (yarn B)
3.5mm or 4mm hook
Pom pom maker or two cardboard discs
Scissors and Tapestry needle

I have used UK crochet terminology throughout.

ch= Chain
tr= Treble crochet
Sl st = Slip stitch
dc= double crochet
RS= Right side (front)
st= Stitch
tr2tog=

Baby 0-6 Months
To begin: With yarn A 4 ch, sl st to form a ring
Round 1: 3 ch (counts as 1 tr), 11 tr into ring. Join with sl st to 3 ch. (12 sts)
Round 2: 2 ch (counts a 1 tr), 1tr into first st , *2 tr into next st. Repeat from * around, join with sl st into 2 ch.  (24 sts)
Round 3: 2 ch (counts as 1 tr), 1 tr into first st, *1 tr into next st, 2 tr into next. Repeat from * around. 1 tr into last st, join with sl st into 2 ch.

Round 4: 2 ch (counts as 1 tr), 1 tr into first st, *1 tr into next 2 sts, 2 tr into next. Repeat from * around. 1 tr into last 2 sts, join with sl st into 2 ch.
Round 5: 2 ch (counts as 1 tr), 1 tr into first st, *1 tr into next 3sts, 2 tr into next. Repeat from * around. 1 tr into last 3 sts, join with sl st into 2 ch.
Round 6: 2 ch (counts as 1 tr), 1 tr into first st, *1 tr into next 4 sts, 2 tr into next. Repeat from * around. 1 tr into last 4 sts, join with sl st into 2 ch.
Round 7- 17: 2 ch (counts as 1 tr), 1 tr into each st around. Join with ss to 2 ch. Fasten off yarn on final round.

For earflaps: With RS facing, locate the centre 13 stitches of the side of the hat (where the ears usually are on the head!).
Join in yarn A. 2 ch, 1 tr into each of the next 12 sts. Turn
2 ch, miss 1, 1 tr into next 9 sts. tr2tog into last 2 sts. Turn.
2ch, miss 1, 1 tr into next 7 sts, tr2tog into last 2 sts. Turn.
2 ch, miss 1, 1 tr into next 5 sts, tr2tog into last 2 sts. Turn.
2 ch, miss 1, 1 tr into next 3 sts, tr2tog into last 2 sts. Fasten off yarn A.

For trim: Join yarn B at back of hat, ch 1, 1 dc into each st around. Make pom pom in yarn B and stitch securely to top of hat.

Baby 6-12 months
Rounds 1-6: as 0-6 months 
Round 7: 2 ch (counts as 1 tr), 1 tr into first st, *1 tr into next 5 sts, 2 tr into next. Repeat from * around. 1 tr into last 5 sts, join with sl st into 2 ch.

Rounds 8-19: 2 ch (counts as 1 tr), 1 tr into each st around. Join with ss to 2 ch. Fasten off yarn on final round.

Work earflaps as before, working with 15 stitches to begin, and decreasing at the start and end of each row. Work trim as before

Toddler 1-2 years
Rounds 1-7: As 6-12 months
Round 8: 2 ch (counts as 1 tr), 1 tr into first st, *1 tr into next 6 sts, 2 tr into next. Repeat from * around. 1 tr into last 6 sts, join with sl st into 2 ch.
Rounds 9-21: 2 ch (counts as 1 tr), 1 tr into each st around. Join with ss to 2 ch. Fasten off yarn on final round.
Work earflaps as 6-12 months.

Toddler 2-3 years
Rounds 1-8: As 1-2 years
Round 9: 2 ch (counts as 1 tr), 1 tr into first st, *1 tr into next 7 sts, 2 tr into next. Repeat from * around. 1 tr into last 7 sts, join with sl st into 2 ch.
Rounds 10-22: 2 ch (counts as 1 tr), 1 tr into each st around. Join with ss to 2 ch. Fasten off yarn on final round.
Work earflaps as before, beginning with 17 sts.

Here's George modelling his very own bobble hat! He is small, so he is wearing the 0-6 month size. You could add some little felt ears, instead of a pom pom if you like...or perhaps add a braid to the ear flaps for a little trapper hat vibe (I didn't add braids to George's as it could potentially be a safety issue for small babies). 

Happy hooking y'all! 
xxx