Showing posts with label Crochet. Show all posts

Friday, 20 January 2017

2017: The Year of Play...

'You can't use up creativity; the more you use, the more you have.' Maya Angelou

Hello, dear readers! It's been a while, eh? The last quarter of 2016 was a very busy one indeed, and I had definitely burnt out by the end of the year. In fact, I'm still feeling the effects of the end-of-year creative burnout now, 20 days into the new year. So I've been trying to give myself fresh new impetus, and allow myself time to explore new ways of being creative, and see how that influences my writing, blogging, IG photography and crochet design. So, having been listening to a few podcasts and read a few blogs, I've decided to adopt a word for the year. I dare say some of you have been mulling this over too; it's a fabulous way to inspire oneself from within, don't you think? 

So, my word for the year is (drum roll please...)

PLAYFUL

I feel like all work and no play has brought me to a point where all crochet is work, and therefore after a period of time, this then becomes a chore. Which is not fair- on me, or the people who love my work and continue to use my skills and willingness to design. So I want to do is try lots of new things, and see how they influence my crochet design. This could be learning new skills entirely, or trying new stitches or techniques within the making I already practice.

So when it comes to crochet, I think it's important to make some more things for me, just experimenting. I've been lucky enough to work with the exciting folks at www.lovecrochet.com, who send me their lovely yarns to play with, and allow me to come up with some fresh new accessories ideas. I enjoy it so much, and some of my favourite quick-to-make and stylish designs have been with these guys. Hop over to the blog here to see my free patterns. 

I want to crochet with some of my more luxurious yarn stash, and part of that will be using these beautiful undyed, natural and British fibres to make a triangular shawl. Too many distractions are stopping my from hooking right now! I also want to try some more textural stitches, and my new job working with a new magazine series called Simple Stylish Crochet (only out in Germany right now) is allowing me to do this, and really explore and expand my crochet skills base. It's hard work but usually involves elements of creativity and playfulness, so will continue to inspire me throughout the year. Also- this gorgeous new book from Claire Mongomerie! I love Claire's palette, and I just know there's still so much for me to learn. I'm going to start with the simple phone cover- love it!


When it comes to knitting, there's so much I want to learn! I want to try more cables, sock knitting and colour work, and pretty much use some of my starting-to-become-epic stash. I've cleared most of my unused stash now, and kept my favourite acrylics (more on that later). Leaving a lovely selection of luxury yarns! I'm trying to stop myself stashing beautiful yarns and actually use them. So I'm joining a mystery knit-along! The Curious Handmade #snowmeltmkal begins next month and will reveal a pattern week-by-week over five weeks, which seems perfectly reasonable, time-scale wise. 
Here are me three chosen yarns, all fingering-weight and from deep stash:
I love how each skein is attached to a memory of where and when it was bought. The pale grey is a beautiful alpaca- Angel from The Chester Wool Co. - and was bought at Bridport Yarn last summer, when we went to stay at lovely Lilac Cottage. It was a blissful family holiday, and we really liked Bridport. The Slate grey in the centre is an incredible baby camel and silk blend, bought from a stand called Sparkleduck at the 2016 Waltham Abbey Wool Show. I went with my mum, as she lives in Waltham Abbey, and we went back to hers and I taught her to crochet afterwards. It was a lovely, freezing, sunny winter's day and I admit I have not yet used any of the yarn I bought. So now I should! The beautiful mustard yellow is very special to me- it's the ultimate mustard luxury yarn and I cannot wait to see how it knits up. It's DyeForYarn merino and silk, this colour way is Golden Beehive, dyed especially for Loop. I bought it on a trip to Loop on my birthday in 2015! So I'm getting really exciting about the mystery knit-along or 'MKAL'. I love Helen's Curious Handmade podcast, so do pop along and add it to your list if you're a knitter or general yarnivore like me. 

Finally, I've got this beautiful and very cool knitting kit from We Are Knitters, and already cast on! I'll show you more next time with a progress update. (ps have you noticed my current grey obsession?!)

Anyway, if you want to explore your creativity and 'playfulness', I can't recommend enough Kate O'Sullivan's podcast 'A Playful Day', enough, where she explores creativity in all its forms- cookery, illustration, knitting, botany and everything in between. And while you're at it, I also love the PomPom Quarterly magazine's podcast- Pomcast! fun and giggles and of course knitting.  I don't have time to watch video ones sadly, but if you do try Potter and Bloom and Cherry Heart. Links in the sidebar I believe. Do you have a favourite podcast to recommend?

Stay in touch guys! I'll be back soon with more yarn talk.
xxx

Thursday, 30 June 2016

The Cool Cottons Collection

Well, it's about time I blogged about crochet, eh? I've been so busy making things for all the magazines (and I do mean AALLLLLL the magazines) that I haven't had time to make anything for myself for a long time. So I've gathered together some of my favourite patterns from the past year or two, and I'm releasing them as PDFs for you to buy and download. 

I cannot tell you how excited about this! I recently met with www.lovecrochet.com and was so excited to be invited to be part of their movement. So I decided to release my downloads through these guys- and the great news is they sell just about EVERYTHING you need to make the projects. You can just add the pattern to your basket, and then add the materials listed below the pattern. Handy, eh?

 So if you search for me as a designer, you can see my first five patterns- the Cool Cottons Collection. Five crochet projects to take you through high summer, all in beautiful, crisp cottons. Some of you may have seen these patterns in magazines before, but for those that missed them first time around, they're now available to keep forever, in my newly-designed PDF format! Wanna meet the gang? Come on then...

 A lined watermelon clutch bag with a zip closure, crocheted in Rico Creative Cotton Aran- isn't it super cute and juicy!

 Is there an occasion when a pineapple bag isn't appropriate? I don't think so. 

 Sandy is a 70s-inspired fringed semi-circular shawl perfect for summer evenings and festivals 

This Woodstock messenger bag is one of my faves.

Delta Dawn is a pretty wrap which features an unusual Japanese floral trim.

To download any of these patterns to keep forever, search under my designer name Kath Webber or CLICK HERE to take you straight to my pattern page, you can also search for me on ravelry and click the links to the pattern. 

Happy hooking everyone!
xxx

Tuesday, 5 April 2016

The Goldberry Shawl

Slow living, crafting and blogging seems to be my way of life at the moment, and do you know what? It suits me just fine. After a busy year of constant deadlines, pushing crochet boundaries and never saying 'no', I've been taking it easy the first quarter of 2016. Self-care is so important and sometimes just doing something you like, or really want to is the best thing of all. Those of you who follow me on Instagram will know that I recently took a fairisle knitting class at Loop, and it was so inspiring. The fabulous Juju Vail taught me so many new techniques, and she continues to inspire me with her beautiful dressmaking and prolific knitting output. While I was at Loop I bought her book, Juju's Loops, and can't wait to get started on the Cinnamon Girl cardigan and Brown Eyed Susan Shawl. However, I had another Loop-related project to complete first.

The wonderful Tif (aka Dottie Angel) recommended this shawl pattern to me way back in December (possibly November?) and began a small crochet-a-long group on Ravelry. It took me a while to select which kind of yarn I wanted to use, as some of the fellow CAL-ers had used aran, worsted and even chunkier yarns for a cosy, winter wrap. When I last visited Loop around the time of my birthday I purchased some limited-edition yarn called 'Speckled Mist'- a fingering/4ply merino by Viola yarns. It's exclusive to Loop to celebrate the shop's tenth birthday. I bought another skein online and began making the shawl after Christmas once my deadlines were done for the year.

I picked it up when I could, after leaving it as an abandoned WIP after the first 20 or so rows- I just wasn't sure this was the best use of my beautiful, expensive yarn. However, I don't like to leave a project unfinished and picked it up again in march and went for the finish line. I found the pattern slightly challenging- not the stitches, you understand, but the wordiness and addition of a poem and plenty of Tolkein. I don't like Tolkein. So if, like me, you prefer your patterns simple, then just follow the charts- they're much easier to read and understand.

As I only had two skeins of the Viola yarn (and at £24 a skein I wasn't prepared to buy a third!) I decided just to see how far the yarn would take me. In addition, I was using 4ply yarn so realising it would come up smaller than a DK or worsted weight shawl, I decided to go for the full 59 rows. I managed to reach around row 56 before my yarn ran out, then spent unnecessary time deciding whether to add a contrast border using stash yarn. I decided not too, actually rather loving the lacy edge, and wondering how it would turn out after a soak with some eucalan and a good block. And here it is...


Isn'tit beautiful? I love how the hand-dyed yarn looks with the pattern...lavender, grey, specks of gold and crimson in there too.

It's drape and lacy-ness have improved immeasurably after blocking, of course, and it's a delight to touch and wear. It's almost a shame the weather has been so mild to wear shawls! But I think it will make the perfect addition to my wedding outfit for a friend's wedding next month.

My next luxury shawl is already on the needles- a knitted shawl called French Cancan in Madelinetosh Merino Light in a stunning indigo blue. Yum!

Happy hooking y'all 
xxx

Thursday, 18 February 2016

A crochet designer? A crochet designer!

So it would appear I'm not exactly getting back into the swing of this blogging lark. And here's why. I'm just so busy! And it's all thanks to YOU. All of you. for your endless support and encouragement, for connecting with me here, on Instagram, Facebook and 'IRL'. Thanks to you, I'm able to find crochet solutions, find creative spirit and come up with ideas that people think are worth paying for.

Over the past year or so I've become a pretty much full-time crochet designer. Of course I'm still working hard on my features writing, too, and really excited to be subediting at 91 Magazine, but the bulk of my time (as you can well understand) is dedicated to crochet. Designing, making and writing up the patterns is really time-consuming but in my mind, time well spent indeed.


Since my book came out THREE YEARS AGO (?!) I've been writing patterns for Inside Crochet, Mollie Makes, Simply Crochet and my blog even featured in Homemaker magazine. More recently I've added some more magazines to my repertoire- The Art of Crochet, Love Crochet and Let's Get Crafting! Knitting and Crochet, and I'm loving the different briefs and design challenges I come up against. I've finally nailed hats! Wahoo! Next up, garments. 

Late last year I was lucky enough to be invited to Simply Crochet's offices for a pattern writing workshop, and the help and support given was amazing. Editor Sara really made me and my fellow designers Hannah Cross, Anne Egan, Louise Smith and the wonderful Fran feel part of the team, and I felt so proud of all the work I've done for them. I hope you don't think this post is a total boast-fest. But it's nice to celebrate one's achievements, yes? and also good for the soul to say 'yes, look what I've done, look at all the things I've made.' 

I'm also really excited that soon you'll be able to download some of my Simply Crochet patterns from Ravelry! For less than the price of a cup of coffee. Amazing. Including this beauty! And my neon doily rug, basket weave trio and super chunky striped and spotty hats. 


Also I met up with the wonderful Steel and Stitch in November (with gorgeous Claire Montgomerie- I was a bit star struck!) and I'm really thrilled to say that I'll be teaching alongside Emma Friedlander-Collins at the British Library (!!!) this Saturday, 20th Feb as part of the Alice and Wonderland Exhibition. It's all free and we'll be making some Alice-themed crochet goodies- come join us!

So anyway, with another four or five project to finish by the end of next week, I'd better get back to it! Visit my Ravelry page for updates on patterns, maybe one day I'll even get around to producing some of my other favourites for you to download. Thanks again guys, you're awesome. 
xxx


Friday, 29 January 2016

Yarn Talk

Throughout January, I had an epiphany. It's not unusual to have this kind of epiphany at this time of year; the start of a new year usually prompts such changes, but I realised I was weighed down with STUFF. So I sheeped out and bought Marie Kondo's best-selling The Life Changing Magic of Tidying. I haven't even got through to the part of how to tidy, but the idea of having objects that 'spark joy' only really struck a chord with me, and so I started with the place that I find is supposed to 'spark joy', and that's my yarn. I've seen bigger stashes than mine, but I felt I just had too much yarn that had no intention of using, that I had gone off, or that was left over from work projects. So I had a big clear out, swapping and selling what I didn't want, or donating it.

Here's what's left of my acrylic:
And I've kept a small stash of Debbie Bliss Cashmerino in this basket too. It was overflowing with Stylecraft Special DK before, so I kept these few colours (2 x Parchment, Forest, Gold, Old Rose and walnut) either for a shawl (possibly My Rose Valley's Nordic Shawl, or Joanne Scrace's Acer) or a granny square blanket. I've also kept the mint, cream and blue from my Annell Rapido collection as I do love these colours. This basket now sparks joy!

I also organised my cotton stash, only keeping my very favourites (some Rowan Handknit Cotton, and a collection of Drops Paris) so they fit snugly into a birdcage that my friend gave me some years ago. I've invested in a cheapo yarn winder, and I wound my super chunky collection nicely, and used up the few balls of chunky that I had, making some mittens and using the chunky Natura XL for a work project. My aran collection now consists of just a few balls of leftovers from personal projects, in case repairs or alterations are needed. I organised all my Debbie Bliss baby cashmerino into one of those big organza bags that Wool Warehouse sends, and have another of my favourite DK yarns. My 'Luxury' yarns all got kept,l of course.
I mean, why wouldn't I? NO FILTER! These yarns really are this gorgeous! I have here (clockwise from top left) some precious The Fibre Company Terra, The Uncommon Thread Lush Worsted, Eden Cottage Yarns Titus 4ply, Collinette Jitterbug, Eden Cottage Oakworth DK (a very generous gift from instagram friend @penelopemakes), DyeForYarn Silk Fingering in a colour exclusive to Loop called Golden Beehive, and that lovely SparkleDuck Baby Camel/Silk. To be fair, virtually all of these skeins will be assigned to knitting projects.

Really what has prompted this yarn stash management drive is the wonderful knitting designer, blogger and podcaster Helen Stewart of Curious Handmade. I've been devoted to her podcasts this month on how she's tackling stash management, and how she's learning to love what she's got. So I'm using up some stash- some baby knits (ssshhh! they're a secret for a friend!) and a shawl for me- some selfish, enjoyable makes to make me appreciate what I've got.

Go have a listen to Helen's podcast and see if you can't get inspired to organise your stash, and join in the #uknewyearstashswap over on Instagram to see if you can get the yarn you've been dreaming of. And join me on Ravelry to see what projects I have queued up and the knit- and crochet-alongs I'm joining.
xxx

Thursday, 29 January 2015

Alexa's jumper

Has winter left yet? The blue skies and bright sunshine says yes, the biting cold wind and imminent snow, ice and sleet says no. Anyway, I'm totally over winter. I need some better light than this low winter sun, though I like the long shadows on days like this. I'm not terrifically keen on the illness though. We have been struck with norovirus this week, paint a big red cross on the door. Yesterday was spent in pyjamas, under blankets and enjoying DVDs, though my big one hated being absent from school. And neither of us were keen on waking in the night for, well, you know...

On Sunday, however, we were in fine health and attended the third birthday of my friend's lovely daughter, Alexa. I decided to make her this...

Isn't it cute? I love the neon trim (even if I do say so myself!) and the colours against the navy body and sleeves. The pattern is based on a Nicki Trench pattern from Cute and Easy Baby Clothes. It's actually a cardigan pattern, but to join it I simply slip stitched at the end of the row, turned and then went back the other way. It was inspired by the Alicia Paulson Mina Dress, which I've made a couple of times. But I wanted something more practical for Alexa, and something warm. I used a 4mm hook to size it up a little, as the sizes in the book only go up to a 24-36 months. However, Alexa is petite like her mama so this is a perfect fit for her.

The colours look better here


I used Stylecraft Special DK in the following shades:
Parchment
Walnut
Gold
Old Rose
Lime
Sherbet
Silver
Fiesta
And Midnight for the deep navy body and sleeves.

As you can see, I worked back and forth as per the cardigan pattern for the first seven rows, the started slip stitching the rows together before turning and working in the opposite direction. I added a ch10 loop for the button at the end of row 1, slip stitching to the row and securely tying it up with the tail ends of yarn. I sewed on a mother-of-pearl button, and just love it. I also added the double crochet rows in contrasting neon pink for extra pops of colour.

Now if only I could find a basic cardigan/sweater pattern for adults so I could make one for me...

xxx

Friday, 16 January 2015

Hi...and a blanket

Thanks for your warm welcome back to blogland, I really appreciate all the comments and new visitors to my page, all thanks to the generous Vanessa over at Coco Rose Diaries, undoubtedly one of my favourite blogs. One of things I'm really enjoying this week is having my comment form back! I couldn't manage my comments with the Etsy template- so do bear that in mind if you're thinking of buying a pre-made template. I've been spending a lot of time on Pinterest lately, really gathering inspiration for the year ahead, and also connecting with hundreds of you over on Instagram. One thing I have been rather lazy about during my break from blogging has been properly visiting favourite blogs, however. It's so nice to connect with people like this! And I'm so grateful that you visit me and comment here, too. I've been using Bloglovin' lately, a great app version on my phone, in fact. It's good for reading blogs and discovering new ones, but you can only 'like' rather than comment. Do many of you use Bloglovin'? I really must gather all my blogs on there and add them to my sidebar list here. Also, I am loving my mustard background. I just love mustard, LOVE IT.

So anyway. Yesterday I gave this FINISHED OBJECT (yes! I know!) away to some friends who just had a baby...


Hi, baby Elliott. Welcome to the world. 

His mama and papa asked me to make this ages ago, inspired by a picture my friend had seen on Pinterest (where else?), so I duly ordered the yarn then completely avoided making it for about two months. Mainly due to deadlines, but also black yarn avoidance. 

Working with black yarn is a lot easier if it's chunky (like this), and in daylight. If you're thinking of embarking on a black project, make sure you're choosing a yarn that doesn't split easily, and perhaps invest in a hook that lights up! 

I kind of made the Hi baby blanket pattern up as I went along. 

BUT. I used chunky yarn and a 6mm hook. 
6 x 100g balls of black
2 x 100g balls of white
Foundation chain was worked until about 105cm long. Work in htr for about 16 rows. 
Then on row 17, 20htr in black, then change to white for 15 sts, change to black for 11sts, then back to white until you get to the last 20 sts, which are worked in black again. Turn. 
Row 18 is worked in reverse, then repeat the rows until you've worked 15 rows in total for your 'i'. Then switch back to black for 15 rows, then construct your 'h'. You basically work as for the i, matching the crown of the h with the long stroke of the i. it's all worked by eye really! the top of the h matches the top of the dot of the i, so it's nice and neat, and the posts of the h are the same width as the i. Then 16 more rows of black! It was 88cm in width for the edge- just 2 rows of simple dc around the edge to finish it off nicely. 

It's cot-size, as you can see here, modelled in George's cot bed, so in the end worked out about 90 x 107cm- an ideal lap blanket! Relatively quick and simple, too. 

See you soon hooky amigos
xxx

Tuesday, 13 January 2015

New year, New blog

Oh, hi. Is anyone there? I decided to have a spontaneous re-design today! Do you like it? I am IN LOVE. I was neglecting my blog. It had become a tired space, no room for growth or improvement. Just drab photos of sporadic makes. It wasn't a place that inspired me anymore, just an obligation that had no worth to me. I've not felt like picking up my hook for myself, and left several knitting projects abandoned. Unfinished books, dusty sewing machine and a busy life built around a growing school boy and difficult toddler have all left me and my blog in the doldrums. 

I once read that comparison is the thief of joy. Ain't that the truth! I don't need my blog to look Scandinavian- because I'm not. And I don't need it to have detailed tutorials and glossy, styled images. All I need is a personal space, cultivated to my tastes and loves; a place that I can escape from real life. Therefore I need somewhere tidy, clean and colourful, reflecting my loves, passions and memories. So I made it happen. I deleted the expensive Etsy-bought template; beautiful though it was it didn't feel like 'me'. 

And on this sunshine-filled winter morning I gathered my very bestest craft supplies: Liberty 'Betsy' tana lawn in my favourite-ever (discontinued) colour way, my very favourite knitting needles (bamboo, 4mm), this stunning Rowan Alpaca yarn (what shall I knit with it? I need it near my face, or my hands, it's the softest thing I've ever known), the best-ever mustard yarn (Rowan Handknit Cotton, FYI), this beautiful blue silk thread on a wooden spool- a relic from my grandparent's sewing box- and a couple of jaunty coloured hooks. I tend to use these plastic hooks for decoration, really I prefer the Clover Amour crochet hooks. I also added my favourite vintage brooch- I'd like to write a little about my favourite outfits too. 

All of this inspired me. Lately, crocheting for work and making things for others has turned me off. It's hard when you also have been recently diagnosed with carpal tunnel syndrome to get motivated! However, it only takes a look around Pinterest, a flick through some favourite magazines (see right) and a pile of books to get me on the right and proper hooky path. I'm finishing off a 'Hook a Stitch' feature for Simply Crochet at the moment, and a huge baby blanket for a friend that I put off for ages...the headache of working with black yarn was too much for me to contemplate! Then I have a list of things to make- including two of Kat Goldin's designs. 


I also have some knitting projects I want to try- a few hats (perhaps for next winter), perhaps a cardigan or two, and some socks of course. My sewing is improving a lot, I'll share a couple of recent makes soon I hope. I want to make dresses, dresses and lots more DRESSES! And blouses, I have recently discovered love of blouses. With pretty handmade skirts and clogs, what can go wrong? I hope this will inspire some style posts, too. 

I have recently got a new camera phone so I hope when the winter light gives way to Spring I'll take some better photos! And perhaps even finish off so projects that have been lying abandoned in my box for so long- remember that Wes Anderson-inspired blanket? Well that's half complete. And I'm having major second-sleeve syndrome with my Quince & Co. Annabel cardigan. I will finish it! So there we are, my creative intentions for 2015. And as you as my witnesses, I know I'll be motivated enough to finish them!

Thanks for staying me with me all these years. I think it's my fourth bloggiversary! See you soon for more stitchy chit chat. 
xxx

Wednesday, 10 December 2014

How to Crochet a Bobble Hat


Now, this is no means a definitive guide, but this is simply MY way of crocheting bobble beanies for my boys. (I cannot resist alliteration, sorry about that.) Lots of people have asked me how to make hats, and last year I published this pattern for ear flap bobble hats. I found that when I returned to it again this year, my sizing was WILDLY off kilter- I mean, HOW big do I think my kids' heads are, exactly? Either that or I actually wrote the wrong stitch on that pattern. My bad, I'm sorry if your toddler hats are enormous and actually fit your granddad instead. Of course, tension, hook and yarn has something to do with it, but if you want that pattern to work I'd suggest switching to htr.

 I wanted to give you a guide to creating your own crochet beanie hat pattern, with some helpful hints and ideas from me. This is all written in UK crochet terminology, with the bobble hat pattern in DK yarn. I'm assuming some crocheting ability, but this should help boost your skills if you're a total beginner. 

AAANNNNNND bobble hat make great gifts, yes? Certainly this time of year, anyway...

Crocheting flat circles
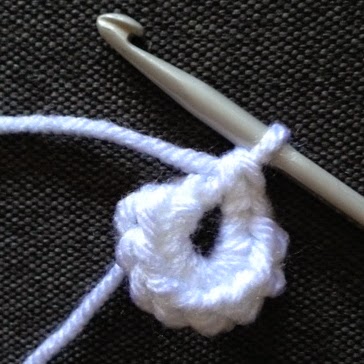
I begin my bobble hat pattern with a flat circle. I think, for hats, it's important to keep drafts out, so to avoid a hole in the epicentre of the hat, I begin with a magic ring. Like so:


 that's blurry, sorry. 

Here's a lovely video, made by lovely person I accidentally met on a train to London one day. She just so happened to be a knitting journalist. What a job! I'm so jealous. Actually she had left and was training to be a midwife but knitting THE most beautiful shawl when we met. 

To make an even, round circle, it's essential to have the right amount of stitches. I always start with 12 in round 1. You can use double crochet (dc)/single crochet, half trebles (htr)/half doubles, or treble crochet (tr)/double crochet. You could even vary the stitch each round for an interesting effect. 

If you're not happy making a magic/adjustable circle/loop/ring, then chain 3, join with a ss and work your first 12 stitches into the ring. 


Join your first round with a slip stitch (ss) to the first stitch in the round. We'll be working in rounds, dontcha know. 

Sizing your Hat
You can be very precise, if you wish, and measure the recipient's head for the circumference of their noggin. Then you need to work out the diameter- just divide the circumference by Pi (3.14 roughly) and you get diameter TADAH! Otherwise just wing it. Phew, that's better. Yes, winging it is the crocheter's friend. 

You'll need to work a certain amount of increase rounds to get a decent enough sized disc (diameter-sized!) that will be shaped into a hat. For each round, you'll need to increase by 12 stitches to get an even, neat circle. 

So here's a quick recipe/ hat pattern:-

To begin: With yarn A 4 ch, sl st to form a ring, or make a magic circle/loop/adjustable ring

Round 1: 3 ch (counts as 1 tr), 11 tr into ring. Join with sl st to 3 ch. [12 sts]

Round 2: 2 ch (counts a 1 tr), 1tr into first st , (2 tr into next st) 12 times, join with sl st into 2 ch. [24 sts]

Round 3: 2 ch (counts as 1 tr), 1 tr into first st, (1 tr into next st, 2 tr into next) 12 times. 1 tr into last st, join with sl st into 2 ch. [36 sts]

Round 4: 2 ch (counts as 1 tr), 1 tr into first st, (1 tr into each of the next 2 sts, 2 tr into next) 12 times, 1 tr into each of the last 2 sts, join with sl st into 2 ch. [48 sts]

Round 5: 2 ch (counts as 1 tr), 1 tr into first st, (1 tr into each of the next 3 sts, 2 tr into next) 12 times. 1 tr into each of the last 3 sts, join with sl st into 2 ch. [60 sts]

Round 6: 2 ch (counts as 1 tr), 1 tr into first st, (1 tr into each of the next 4 sts, 2 tr into next) 12 times, 1 tr into each of the last 4 sts, join with sl st into 2 ch. [72 sts]

And continue like that! I would say that 5 increase rounds is plenty for a newborn baby hat, 6 for a baby, 7 for a toddler and 8 for a child of around 4-8. Of course you can keep on increasing for an adult hat! 10 increase rounds would be about the right size, so round ten would look something like this:

Round 10: 2ch (counts as 1 tr), 1 tr into first st, (1 tr into each of the next 8 sts, 2tr into next) 12 times, 1 tr into each of the last 8 sts, join with ss to ch-2. [120 sts]


Shaping your Hat:

After this, you simply work as many rounds without increasing as you wish, in order to achieve the bowl-shape for your hat. I would say 8-10 rounds like the following will give you a cosy hat:

ch2 (counts as tr), 1tr into each st around, join with ss into ch-2. 

But repeat this round until you're happy with the length. 

To change colour at the end of the row, simply work the first part of your stitch in the old colour:

Then drop the old yarn, and prepare your new yarn. Complete the stitch in your new colour. This will make sure you have a neat join with no weird colour blocks where they shouldn't be:


Finishing your Hat

Ribbed cuff: 
A cosy ribbed cuff ensures a tight fit and looks marvellous. Here's an easy (cheat's) way to achieve it in crochet. First count the stitches in your hat. Turn the hat upside down and count the 'V's; if you have counted correctly, you should have stitches= 12 x (amount of increase rounds). Yes? Make a note of this. Good. Then let's proceed. 

ch 16, Beginning in 2nd chain from your hook, dc (sc) into each ch to end, turn. 

Round 2: ch1, 1dc into back loops ONLY (blo) of each st along. Turn. 

Repeat row 2 until you have as many rows as stitches in your hat round. Hurrah! Clever, eh? Now join the cuff by placing wrong sides together and slip stitch the cuff to hat, matching each row end of the cuff with a stitch of the bottom of the hat. Sew up the little cuff seam, and turn up!

If you want to make ear flaps, check out the tutorial on my ear flap hat pattern. 

Adding a bobble (pom pom) will increase your hat pleasure considerably, as Albie demonstrates here:

And George, well he refuses to wear his hat. End of. This is best I could do. Please don't judge my parenting on his dummy, if you knew the noise that kid makes you would pacify him too. (he is teething canines and it's the only thing that makes him happy). 


I have used Stylecraft DK Special (acrylic yarn) for these hats, and used a 3.5mm hook. 

Albie's hat is in the following colours:
Walnut 
Petrol
Spice
Lime
Parchment

George's Hat is in:
Petrol
Sherbet
Walnut
Silver 

So there you have it. A simple, adaptable DK yarn crochet hat in treble crochet. 

Merry makings!
xxx


Tuesday, 21 October 2014

Cosy crochet slipper tutorial

I've been wanting to crochet a pair of slippers for absolutely YONKS. I tried and failed at making the beautiful slippers in my Japanese crochet book, and didn't fancy making thick, chunky boots. Just something simple to slip over bare feet or tights, in economical DK yarn. 

I spotted the ever-so-lovely Paula (@polly_pet) on Instagram had made her own pair inspired by some she had seen on Pinterest, and she kindly advised me on how she made hers. I just couldn't get them to work like that, either. Either too long, or too tight, or too wide. My feet are quite wide, you see. So after an evening or two of trial and error I finally came up with a workable design, and here it is. Hook them up to your heart's content! They'll make lovely (sorry) Christmas presents! 


They're ladies sizes, and crocheted in DK yarn so ideal if you have stash that needs using up. 

The pattern is worked in rounds until the piece measures the ideal length until you hit your ankle. I've written the pattern in three sizes- SMALL (size 36/37), MEDIUM (size 38/39) and LARGE (size 40/41). Size medium and large are in the brackets. If you need to adjust the length, just add extra rows or stop as you get to your ankle, basically. The the remaining piece is worked back and forth.

All terms are UK, if you're in the US please note this is all worked in hdc and sc :) 

You will need:


  • 100g DK Yarn (I used 2 x 50g balls of Drops Karisma bought at a bargain price from the shop where I teach), plus extra contrasting yarn for pom poms
  • 4mm hook
  • 2 stitch markers (free gift with issue 24 of Simply Crochet! more on that later...)
  • Some spare time (lucky you!)
  • A good film (I recommend I Capture the Castle, which is what I watched while I hooked these up)

To begin, Ch4, join with ss into ring.
  1. Ch2 (counts as htr), 11htr into ring, join with as into ch-2. [12 sts]
  2. Ch2 (counts as htr), 2htr into each st around, 1htr into last st. Join with ss into ch-2. [24 sts]
  3. Ch2 (counts as htr), *2htr into next st, 1htr into next, repeat from * to last st, 2htr into last st, join with ss into ch-2. [36 sts]
  4. Ch2 (counts as htr), 1htr into each st around, join with ss to ch-2. [36 sts]
  5. Repeat round 4 17 (19, 21 times more). Fasten off.                                                


Positioning the joining seam so that it sits at the sole of the slipper, place two stitch markers 7 sts apart at the top of the work, to indicate the 9 st space for the foot opening. Rejoin the yarn in the st next to the marker,


Heel: 
  1. Ch 2 (does not count as htr), 1htr into  same st as ch-2, work 1htr into each of the next 26 sts. Turn.
  2. Repeat as above 9 times. 
Assembly: With right sides facing place ends of slipper together and slip stitch to join together. Fasten off.

To finish: 
Rejoin yarn at seam and dc around edge, working 1dc into each row end and 1dc into each front st. Fasten off.


Make up 2 x 30mm Pom Poms in whichever manner your prefer (I use the clever Clover Pom Pom makers- so quick!) and attach. Weave in any remaining ends. Pop on feet and enjoy. 
        
Apologies for the rubbish pictures, I thought I ought to quickly snap what I was doing but the light was poor and my lens is still scratched. 

But I sure do love these slippers! And so will you. Happy feet all around. 

TTFN 
xxx